Running Scenarios
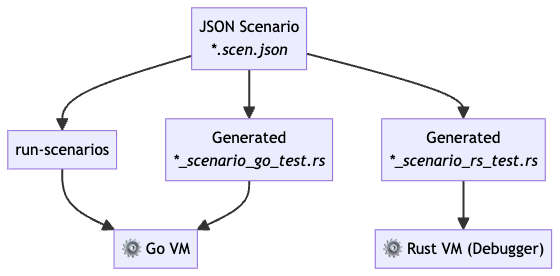
The Klever smart contract testing infrastructure is designed with scenarios in mind, and there are various ways to execute them. The following diagram illustrates the available options:

To run a scenario, you typically have a JSON scenario file (e.g., example.scen.json). There are two main methods for executing scenarios:
-
Using the
run-scenariosStandalone Tool:- The
run-scenariostool is part of the VM tooling. - You can execute scenarios by running the command
run-scenarios <path>, where<path>can be a specific scenario file or a folder containing multiple scenario files. - If you provide a folder path, the tool will run all scenario files with the
.scen.jsonextension in that folder. - The results are printed to the console.
- The
-
Integration in a Rust Project:
- To integrate scenario tests into a Rust project and run them as part of your Continuous Integration (CI) pipeline, you need to write Rust tests that execute the scenarios.
- The standard project layout includes folders for scenarios, source code (
src), and contract code (wasm). - Rust tests for scenarios should be placed in the
testsfolder and named following the convention:<contract_name>_scenario_go_test.rsand<contract_name>_scenario_rs_test.rsfor the Go and Rust backends, respectively. - You can use the
#[ignore]annotation to temporarily skip tests that you don't want to run.
Example Rust test setup for Go and Rust backends:
use klever_sc_scenario::*; fn world() -> ScenarioWorld { ScenarioWorld::vm_go() // For the Go backend // OR // ScenarioWorld::new() // For the Rust backend } #[test] fn my_contract_go() { world().run("scenarios/my_contract.scen.json"); } #[test] #[ignore = "Reason to ignore"] fn ignored_test_go() { world().run("scenarios/ignored_test.scen.json"); }- It's customary to add a
_goor_rssuffix to the test functions to distinguish between the Go and Rust backends. - The
world()function sets up the testing environment.
Setting Up the Rust Backend Environment
When using the Rust backend, you may need to set up the testing environment, as shown in the example above. The minimal setup includes the following:
- Setting the current directory from the workspace using
set_current_dir_from_workspace("<contract_crate_relative_path_to_workspace>"). - Registering the contract using
register_contract("file:<path_to_binary>", <contract_crate>::ContractBuilder). This tells the framework how to deploy or run the contract by specifying its binary path and builder.
The ContractBuilder object is generated automatically for each contract by the #[klever_sc::contract] procedural macro.
Auto-generating Boilerplate Code
Writing test functions manually for each scenario can be tedious and error-prone. To simplify this process, you can use the sc-meta test-gen tool, which automates the generation of test functions for scenarios. Here's how it works:
- If no
*scenario_go_file.rsor*scenario_rs_file.rsfiles are found, you can create them automatically using the--createflag. - The tool generates test functions for each scenario in the
scenariosfolder. - Existing tests with
#[ignore]annotations or comments are preserved. - The tool can be called multiple times to update tests when scenarios change.
- It supports generating test functions for multiple contract crates at once.
Here's an example of how to use the sc-meta test-gen tool:
sc-meta test-gen --path <target_directory> --create
--path: Specifies the target directory where the tool should search for contract meta crates. The default is the current directory.--ignore: Allows you to specify directories to ignore. The default is to ignore thetargetdirectory.--create: Creates test files if they don't exist.
Using this tool can save you time and ensure that your scenarios are always covered by tests.